Tub-to-Shower Conversion: What to Expect
Converting a tub to a walk-in shower? See the process steps, waterproofing, glass options, timeline and cost factors for Arvada bathrooms.
Why tub to shower conversion Arvada projects are popular
You know exactly how this plays out in most homes. The second bathtub sits completely empty for months, collecting dust instead of providing a relaxing soak.
If you are planning a tub to shower conversion, Arvada real estate trends show it is the best daily upgrade you can make. A tub-to-shower conversion keeps the existing plumbing layout mostly intact while visually expanding the room.
Our team at Arvada Remodeling Pros has seen this specific project become the most requested bathroom update across the Greater Denver area. Beyond the visual appeal, the numbers make perfect sense.
Switching to a walk in shower conversion offers several immediate benefits:
- Massive water savings: A standard bathtub requires 70 to 80 gallons to fill, while a 10-minute shower with an EPA WaterSense head uses just 20 gallons. This simple change drastically lowers your monthly utility bills.
- Strong financial returns: According to 2025 and 2026 market data, a midrange bathroom renovation in the Denver metro area delivers a 74.8% return on investment. You are building actual home equity, not just spending on aesthetics.
- Improved safety: Choosing to convert tub to shower floor plans removes the high step-over barrier, making the space ideal for aging-in-place.
Let’s look at the actual construction steps, the specific materials that prevent leaks, and a few practical ways to plan your budget.
The process, step by step
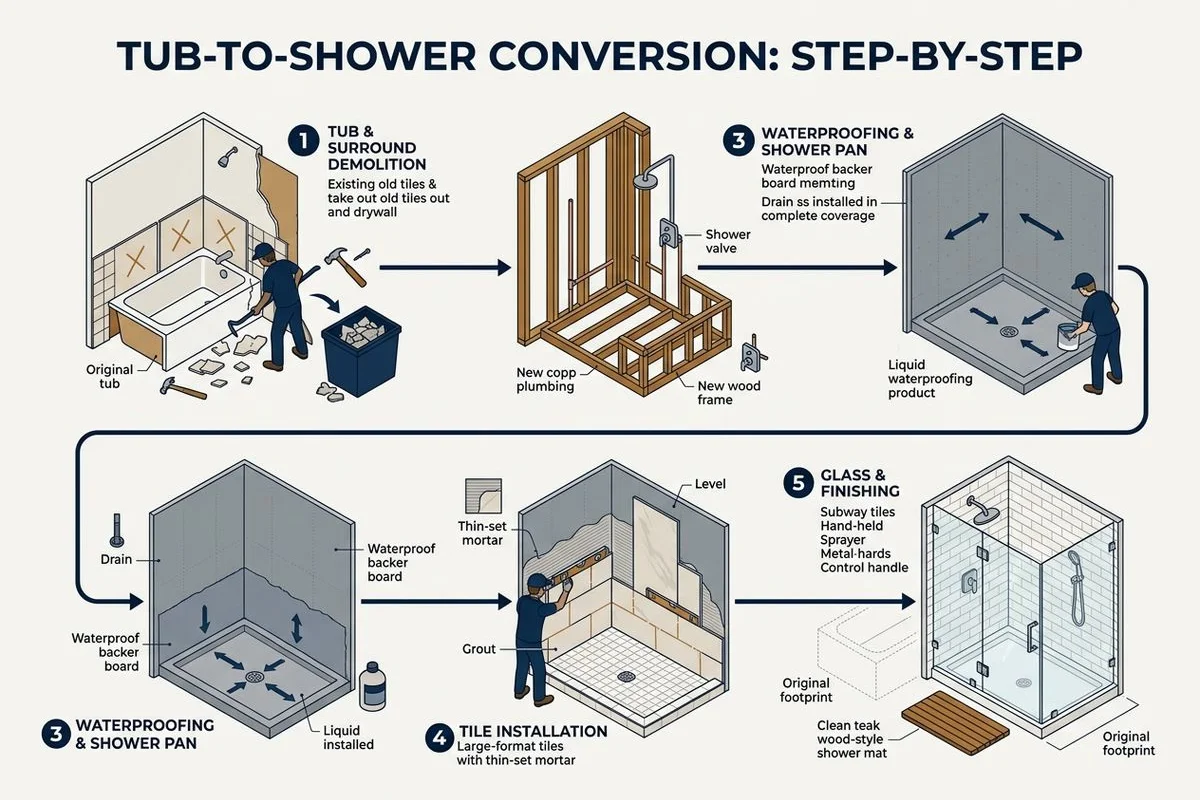
Understanding the exact sequence of events helps you prepare for the temporary disruption. The timeline generally spans three to four weeks from the first swing of the hammer to your first shower. Active work on site usually takes about 8 to 10 days.
We organize this workflow into distinct phases to keep the project moving smoothly. Moving the drain requires an official plumbing inspection by the City of Arvada or your local municipality. Passing this inspection is a non-negotiable step before any waterproofing begins.
Here is the typical sequence you can expect:
- Day 1-2: Demolition. The existing tub, surround, and surrounding wall materials are removed down to the bare studs and subfloor.
- Day 3-4: Plumbing rough-in. The drain shifts from the tub location to the new shower center or to one wall for a modern linear drain. The shower valve is set at a comfortable height of 38 to 42 inches off the finished floor.
- Day 5-7: Waterproofing. Schluter Kerdi-board covers the walls and transitions into the pan. Every single seam gets sealed with Kerdi-band.
- Day 8-12: Tile installation. The walls go up first, followed by the floor, niche, and bench details. The grout then cures for a full 24 to 48 hours.
- Day 13-14: Glass measurement. A custom frameless glass enclosure is measured precisely against the finished tile.
- Day 15+: Final finish. The glass arrives and gets installed, fixtures receive their final mounting, and silicone seals all glass-to-tile transitions.
Our biggest piece of advice is to anticipate the glass fabrication lead time. Local Colorado glass fabricators typically need two to three weeks to temper and cut custom panels. The shower is effectively finished during this waiting period, but you simply cannot use it until the glass goes in.
Waterproofing: the part that matters most
A shower’s true longevity depends almost entirely on the materials hidden behind the tile. Most failed showers look perfectly fine for a few years before water rot destroys the framing.
We exclusively install Schluter Kerdi-board on every shower project to prevent these hidden disasters. This premium foam panel features a factory-bonded waterproof membrane. The system creates single-piece walls, seams sealed with Kerdi-band, and a pan tied directly into the drain with a Kerdi-drain assembly.
The resulting tile-ready envelope is completely watertight. The older alternative of using cement backer board with a loose plastic liner creates far too many potential failure points.
Pro Tip for Maximum Warranty Coverage: If you pair the Kerdi-board system with specific Schluter thin-set mortars like ALL-SET or FAST-SET, you gain a massive benefit. Registering this exact combination within 90 days of installation upgrades the standard 10-year guarantee to a lifetime system warranty.
Our installers refuse to compromise on this critical layer. Cutting corners here guarantees expensive water damage down the road. A fully sealed system provides total peace of mind every time you turn the water on.
Glass options
Choosing the right enclosure completely defines the final look and feel of your new space. Standard 3/8-inch thick tempered glass is the industry baseline for safety and durability.
We always recommend matching your glass hardware finish directly to your shower valve and drain grate. This simple design trick unifies the entire bathroom visually.
Here is a breakdown of the most common enclosure styles and their typical installed costs.
| Glass Style | Visual Impact | Price Range (Installed) | Best Application |
|---|---|---|---|
| Frameless Glass | Clean, modern, and highly transparent. Features minimal chrome or matte black hardware. | $1,200 to $2,500 | Showcasing premium tile work and creating an open, airy feel. |
| Semi-Frameless | Visually busier due to the metal framing around the perimeter edges. | $600 to $1,200 | Budget-conscious renovations that still need a solid glass enclosure. |
| Sliding Door | Practical and space-saving. Hardware slides along a top or bottom track. | $800 to $1,500 | Narrow bathrooms where a swinging glass door would hit the toilet or vanity. |
| Curbless / Walk-In | No door at all. Often features a single fixed glass panel to block spray. | Varies widely | Maximum accessibility and smooth floor transitions. Requires precise slope planning. |
Cost factors
Budgeting accurately requires looking at both raw materials and specialized labor. For a standard tub to shower conversion, Arvada homeowners typically spend between $8,500 and $16,000 in total, which sits at the lower end of the broader Arvada bathroom remodel cost spectrum.
We find that tile selection and glass complexity are the two biggest variables controlling your final price. Large-format porcelain tiles cover wall space quickly and require fewer grout lines. Choosing these larger tiles often reduces labor costs compared to installing intricate, small mosaic patterns.
Here is what a typical budget breakdown looks like across two main categories.
Core Construction and Plumbing Costs
- Demolition and disposal: $800 to $1,200
- Plumbing rough-in: $1,500 to $2,500
- Waterproofing substrate (Schluter): $800 to $1,500
- Miscellaneous finish (paint, baseboards, trim): $500 to $1,000
Finishes and Fixtures
- Tile material: $400 to $1,500 (depending heavily on selection)
- Tile labor: $3,000 to $5,000
- Shower fixtures (valve, head, handheld): $500 to $1,500
- Frameless glass: $1,200 to $2,500
Our estimators use these specific categories to provide transparent, line-item pricing. The local Denver market strongly rewards this level of quality. The 74.8% cost recovery average mentioned earlier proves that a well-executed walk in shower conversion is money well spent.
When NOT to convert
While ditching the tub is usually a great idea, it is not the right move for every single property. Removing the only bathtub in a home can actually limit your buyer pool.
We will talk you out of a tub-to-shower conversion if certain red flags pop up. Protecting your property value is always the top priority.
Consider pausing the project if any of these situations apply to you:
- It is the only tub in the house. Families with children under five strongly prefer having at least one bathtub.
- You plan to sell within a year. Appraisers and buyers often expect a full bath in a standard single-family layout to maximize home value.
- You plan to rent to young families. Similar to selling, tenants with infants will look elsewhere if a tub is missing.
- Your plumbing wall has major hidden issues. If the pipes are severely corroded, a simple conversion is not enough. A larger, more comprehensive remodel makes more sense to fix the root problem.
Talk to our team about whether a tub to shower conversion Arvada project is right for your specific bath.
An honest assessment upfront saves you from making a costly layout mistake.
Frequently Asked Questions
How long does a tub-to-shower conversion take?
Will I lose resale value removing a tub?
Can the same plumbing be used?
More Guides in This Series
How Much Does a Bathroom Remodel Cost in Arvada?
Arvada bathroom remodel costs by type — powder, full and master. See the price drivers (tile, shower system, layout) and budget guidance.
Small Bathroom Remodel Ideas to Maximize Space
Maximize a small bathroom in an older Arvada home with smart layout, storage and light/tile tricks — plus a realistic small-bath budget.
Learn more about Bathroom Remodeling
Ready to talk through your specific project? We'll meet you at home and walk through realistic budget and timeline ranges.